![]() PiRelay - Raspberry Pi GPIO Control
PiRelay - Raspberry Pi GPIO Control
ABOUT PIRELAY
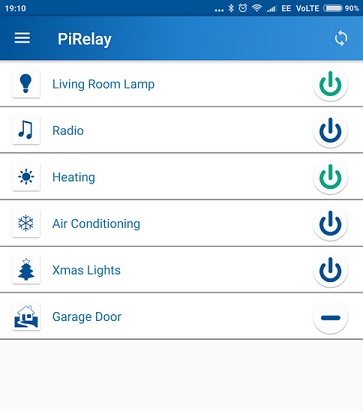
PiRelay is an Android app you can use to Switch or Pulse the GPIO Pins of a Raspberry Pi connected to Relays. To use this app you will need to setup your Raspberry Pi and Relays which the following guide will walk you through. The relays can be connected to switch an electrical circuit for controlling things like Lights, Fans, Motors, Gates, Doors, Heating, Air Conditioning or anything else you might want to control.
If you have any Feedback for me, Issues with the app or Questions, Please ask in my thread on the Raspberry Pi forum
Features in PiRelay
- Control up to 100 Relays
- Use up to 10 Raspberry Pi’s
- Ability to send a pulse signal (i.e. Switch relay on then immediately off)
- Swipe down to refresh relay status
- Ability to assign Icons to relays
- Alternative On/Off Icons
- Refresh relay status
- Screen rotation
- Pi Header Diagrams for Rev1 (P1) & Rev2 (J8) boards
- Ability to change the Title Bar Name
- Ability to set the Wiring Pi Pin # used by each relay
- Ad Supported Free App with optional “In App Purchase” to remove ads
Disclaimer: These instructions are provided as is for information purposes only, and the author Jason Findlay cannot accept any liability for and injury or damage caused by following these instructions. Whilst these instructions can be considered safe to follow, you proceed at your own risk.
PIRELAY INSTALLATION
Install The Software On Raspberry Pi
Setting Up Your Raspberry Pi
1. Run the below terminal commands to install PiRelay on your Raspberry Pi.
You MUST complete this step before the PiRelay App will work with your Raspberry Pi.
NOTE: It is recommended to run each command individually.
Commands to Install: WiringPi, Apache, PHP & Download the GPIO PHP File
sudo apt-get update
sudo apt-get install wiringpi -y
sudo apt-get install apache2 libapache2-mod-php -y
sudo wget https://pirelay.jasonfindlay.com/downloads/gpio.dl
sudo mv gpio.dl /var/www/html/gpio.php
Additional Commands for Raspberry Pi 4
NOTE: Raspberry Pi 4 Users will need to run the following commands in addition to the above to update WiringPi before it will work.
cd /tmp
wget https://project-downloads.drogon.net/wiringpi-latest.deb
sudo dpkg -i wiringpi-latest.deb
Setting Up Your Android Device
2. Download Pi Relay app from the Play Store here: PiRelay App - Play Store
Make sure your Pi and Android Device are on the same network. Then in the app settings you can define a custom Server URL. This is the network path to your Raspberry Pi. The default path is “http://raspberrypi/”, however you can define an IP address or a custom URL. If you want to use PiRelay over the internet then you will need to configure your own port forwarding on your router (By default PiRelay uses Apache2 on port 80).
That’s it… your Pi is now ready to use with PiRelay App to start switching or pulsing the status of your GPIO pins.
HARDWARE CONFIGURATION
The Relays
You need to source some 5v relays that will work with the Raspberry Pi. The simplest solution is to purchase a 5v Relay Module Shield such as this one on eBay: 5V Relay-Board-Module
This is the board I use and works very well. I am using the 8 channel relay version which is great value. It consists of 8x 250v 10Amp Relays, perfectly capable of running directly from the Pi. (Note that if all 8 relays are engaged at the same time, you will be drawing around 600mA of power from the Pi, so a 2 amp or above power supply is recommended if powering it directly from the Pi, alternately you might want to provide power to the board with an additional 5v power source)
The Connector
To connect the Raspberry Pi to the Relay Module you will need to connect wires from the GPOI pins on the Raspberry Pi to the pins on Relay Module. You can do this by any means you like, but I found using a “DIY Ribbon Cable” with connectors the simplest which can be purchased cheaply from eBay.
The first 8 relays are set to default to WiringPi GPIO Pins (GPIO 0 to 7) for you which you can change in the app settings. Attach your relay connectors the respective GPIO pin you are controlling with the PiRelay App.
If you have completed the installation and wiring of your Pi to your relay board you should now be able to switch relays with your PiRelay App.
The WiringPi Pins / GPIO Header
Check out the following page for an interactive diagram of the PinHeader on a Raspberry Pi showing the corresponding GPIO pin and WiringPi Pin number used in the PiRelay app.